Best Spotify Equalizer Settings
When it comes to streaming music, Spotify is undoubtedly one of the most popular platforms worldwide. Did you know that Spotify also offers a built-in equalizer? And, do you know how to use it? (Updated for 2026 with the latest presets and access steps.)
The Spotify equalizer allows you to fine-tune the audio settings to unlock the full potential of your music and tailor it to your personal preferences.
Let's will show you what the Spotify equalizer is, how to access it, and suggest the best EQ settings to make Spotify sound even better.
Understanding the Spotify Equalizer
The Spotify equalizer is a powerful tool that enables you to adjust the audio frequencies of your music. By manipulating specific frequency bands, such as bass, treble, and midrange, you can customize the sound output according to your liking.
This allows you to enhance certain elements of your music, such as bass thump or vocal clarity, and create a more personalized listening experience.
Accessing the Spotify Equalizer on Different Systems
Depending on the device you're using, there may be different ways to access Spotify's equalizer.
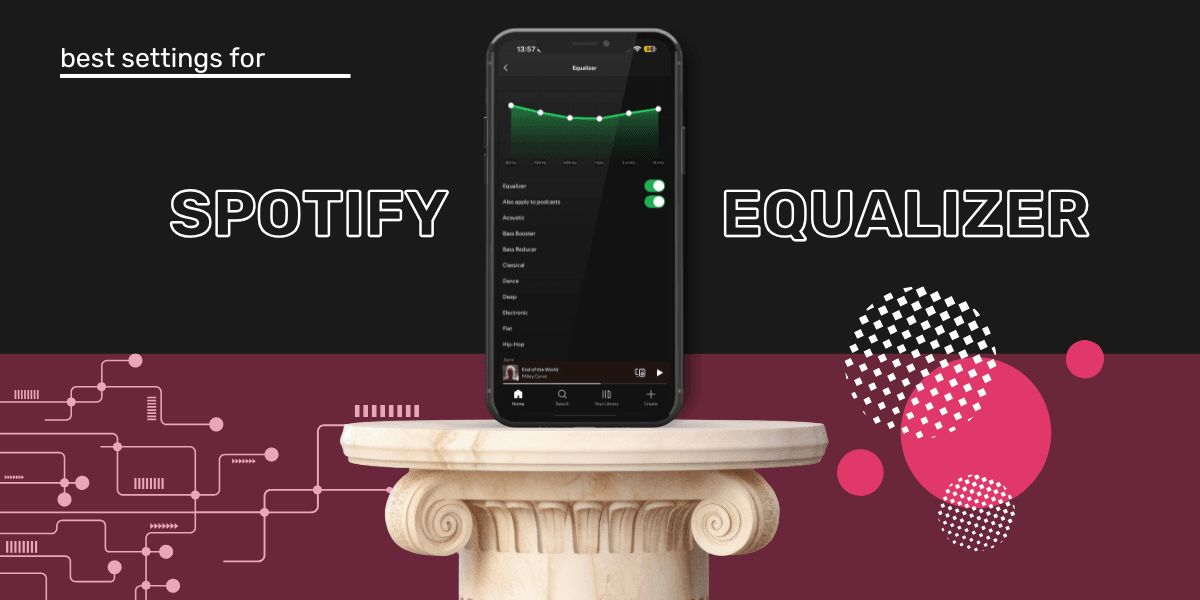
How to access Spotify Equalizer on iOS

If you're an iOS user, accessing the Spotify equalizer is a breeze. Follow these steps:
- Open the Spotify app on your iOS device.
- Tap the gear icon located at the upper-right corner of the screen to access the settings.
- In the Settings menu, scroll down and tap on "Playback."
- Under "Playback," you will find the "Equalizer" option.
- Tap on "Equalizer" to access the equalizer settings.
How to access Spotify Equalizer on Android

While Spotify's Android app doesn't feature a built-in equalizer, you can still customize your sound by accessing your device's native equalizer settings. Here's how:
- Open the Spotify app on your Android device.
- Tap on the "Home" tab at the bottom of the screen.
- Tap on the gear icon located at the top-right corner to access the settings.
- In the Settings menu, scroll down and tap on "Equalizer."
- You will be redirected to your smartphone's built-in equalizer settings, where you can adjust the sound according to your preferences.
Please note that the availability of presets and frequency sliders may vary depending on your device and Android version.
How to access Spotify Equalizer on MacOS & Windows

Good news! You can access Spotify equalizer on your desktop.
- Launch the Spotify app on Windows or Mac.
- Tap on the profile icon in the menu and go to Settings.
- Scroll down to "Playback" section and find the "Equalizer" option. If the "Equalizer" option is toggled off, switch it on.
- Click the drop-down bar to the right of the Presets. Select a preset.
- Alternatively, drag the dots on the equalizer to set your own equalizer.
Best Spotify Equalizer Settings
Now that you have accessed the Spotify equalizer, let's explore some recommended settings to enhance your music experience. Keep in mind that the ideal equalizer settings may vary depending on personal preferences, the type of headphones or speakers you use, and the genre of music you listen to.
Nevertheless, Spotify offers a range of EQ presets designed to cater to different music genres and playback scenarios. Let's explore some of the popular EQ presets available on Spotify.
Disclaimer: It's important to note that the availability of EQ presets may vary depending on the Spotify app version and platform. The presets provided here come from the iOS app.
- Flat: The "Flat" preset aims to maintain a neutral sound response by keeping all frequency bands at the same level. It provides a balanced audio experience without emphasizing any specific frequencies.
- Bass Boost: As the name suggests, the "Bass Boost" preset emphasizes the lower frequencies, resulting in a more pronounced and powerful bass response. It is well-suited for genres such as hip-hop, electronic, and music with heavy basslines.
- Electronic: The "Electronic" preset is tailored to enhance the sound quality of electronic music genres, including techno, house, and EDM. It emphasizes the bass frequencies while maintaining clarity in the midrange and treble.
- Hip-Hop: The "Hip-Hop" preset is designed to bring out the energy and impact of hip-hop and rap music. It emphasizes the low-end frequencies and adds some extra punch to the bass, enhancing the overall rhythm and groove.
- Pop: The "Pop" preset enhances the overall clarity and presence of pop music. It emphasizes the vocals and midrange frequencies, allowing the vocals and instruments to stand out prominently.
- Rock: The "Rock" preset is tailored for rock music enthusiasts. It boosts the midrange frequencies, which are crucial for guitars and vocals in rock tracks, creating a more dynamic and powerful sound.
- Spoken Word: The "Spoken Word" preset optimizes the audio settings for listening to podcasts, audiobooks, and other spoken content. It emphasizes the clarity of vocals and enhances speech intelligibility.
- Acoustic: The "Acoustic" preset is designed to enhance the natural sound of acoustic instruments. It provides a warm and balanced audio response, suitable for genres like folk, acoustic pop, and singer-songwriter music.
- Small Speakers: The "Small Speakers" preset compensates for the limitations of smaller or low-quality speakers by adjusting the equalizer settings accordingly. It aims to improve the overall sound quality and clarity when listening through such devices.
You can further customize the equalizer settings manually to fine-tune the sound according to your preferences and specific playback scenarios.
Custom Presets
Experimenting with custom presets is another great way to find the perfect sound for your music. If the available presets don't meet your expectations, you have the flexibility to fine-tune the sliders manually until you find the perfect combination of settings for your desired sound.
Discovering the perfect equalizer settings can be a subjective and personal journey due to various factors that influence sound perception. It's important to acknowledge that there is no universal "holy grail" of Spotify EQ settings. Two primary factors make it impossible to find a one-size-fits-all approach to equalizer settings:
- User Preference: Different individuals have distinct preferences when it comes to sound. Some may prefer an equal distribution of detail across all frequencies, while others may prioritize a powerful and punchy bass response.
- Audio Device: The sound signature of speakers and headphones is influenced by the manufacturer's fine-tuning. Each audio device has its own unique characteristics and limitations in terms of the frequencies it can effectively reproduce.
However, there are ways to optimize the EQ settings for specific music genres and to match your audio device's sound signature. You can achieve this by utilizing Spotify's EQ presets or by manually adjusting the sliders to create a sound that suits your preferences.
Within Spotify's EQ settings, you'll find a set of sliders (five sliders on most platforms, and six on iOS) that allow you to modify the audio's characteristics. Each slider corresponds to a specific aspect of the frequency spectrum, influencing different aspects of the sound.
Remember, the process of finding the best equalizer settings is a highly individualized endeavor. Experiment with different presets, make manual adjustments, and trust your ears to guide you towards the sound quality that resonates with your personal preferences and audio devices.
EQ Levels For Spotify
Here is a quick breakdown of where you can start your manual EQ journey. Once you have tested these levels, you can start adjusting the sliders a little more to your tastes - but these are a great start!
Bass Boost EQ levels
Ideal for: Hip-hop, EDM, and bass-heavy genres.
Bass:
- 60 Hz: +6
- 150 Hz: +3
Midrange:
- 400 Hz: -2
- 1 kHz: -4
Treble:
- 2.4 kHz: -2
- 15 kHz: +3
Treble Boost EQ Settings
Ideal for: Classical, acoustic, and vocal-centric music.
Bass:
- 60 Hz: -2
- 150 Hz: -1
Midrange:
- 400 Hz: +1
- 1 kHz: +2
Treble:
- 2.4 kHz: +4
- 15 kHz: +6
Balanced EQ Levels - bread and butter standard
Ideal for: A mix of genres; overall balanced sound.
Bass:
- 60 Hz: +2
- 150 Hz: +1
Midrange:
- 400 Hz: 0
- 1 kHz: 0
Treble:
- 2.4 kHz: +1
- 15 kHz: +2
Acoustic EQ Levels- vocal clean up
Ideal for: Acoustic, folk, and singer-songwriter music.
Bass:
- 60 Hz: -2
- 150 Hz: 0
Midrange:
- 400 Hz: +2
- 1 kHz: +3
Treble:
- 2.4 kHz: +4
- 15 kHz: +5
Classical EQ levels for clarity in the top notes
Ideal for: Classical and instrumental music.
Bass:
- 60 Hz: -1
- 150 Hz: +1
Midrange:
- 400 Hz: +3
- 1 kHz: +2
Treble:
- 2.4 kHz: +3
- 15 kHz: +4
Pop EQ Levels (lifts entire tracks)
Ideal for: Pop and mainstream music.
Bass:
- 60 Hz: +3
- 150 Hz: +2
Midrange:
- 400 Hz: +1
- 1 kHz: +2
Treble:
- 2.4 kHz: +3
- 15 kHz: +4
Rock EQ Levels (improves the backline + vocals)
Ideal for: Rock and metal music.
Bass:
- 60 Hz: +4
- 150 Hz: +2
Midrange:
- 400 Hz: 0
- 1 kHz: -1
Treble:
- 2.4 kHz: +1
- 15 kHz: +3
Vocal Booster EQ Settings (clarity)
Ideal for: Podcasts, audiobooks, and vocal-heavy tracks.
Bass:
- 60 Hz: -3
- 150 Hz: -1
Midrange:
- 400 Hz: +2
- 1 kHz: +4
Treble:
- 2.4 kHz: +4
- 15 kHz: +3
EQ Levels For Dance music
Ideal for: Dance and electronic music.
Bass:
- 60 Hz: +5
- 150 Hz: +3
Midrange:
- 400 Hz: 0
- 1 kHz: -2
Treble:
- 2.4 kHz: +1
- 15 kHz: +4
EQ Levels For Podcasts
Ideal for: Enhancing speech clarity in podcasts.
Bass:
60 Hz: -4
150 Hz: -2
Midrange:
400 Hz: +1
1 kHz: +4
Treble:
2.4 kHz: +3
15 kHz: +2
Best EQ For Live Recordings
Ideal for: Live recordings and concert-like experiences.
Bass:
60 Hz: +3
150 Hz: +1
Midrange:
400 Hz: 0
1 kHz: +2
Treble:
2.4 kHz: +3
15 kHz: +5
Best Spotify Equalizer Settings for AirPods
If you're using AirPods or any other Bluetooth headphones with Spotify, you may be wondering how to optimize the equalizer settings specifically for these devices.
While the ideal settings can vary based on personal preference, here are some recommendations to enhance your AirPods listening experience on Spotify:
- Bass Boost: AirPods tend to produce a slightly weaker bass response compared to other headphones. To enhance the bass while maintaining overall balance, consider increasing the lower frequency bands, such as 60Hz and 125Hz, on the equalizer.
- Vocal Clarity: AirPods excel in delivering clear vocals. To emphasize the vocals and enhance their clarity, consider slightly boosting the midrange frequencies around 1kHz to 3kHz.
- Customize to your liking: Every pair of AirPods may have slight variations in sound output. Therefore, it's recommended to experiment with different equalizer settings and make slight adjustments to find the combination that suits your specific AirPods and music preferences.
How to Make Spotify Louder
If you find that the volume level on Spotify is lower than desired, there are a few steps you can take to make it louder:
- Check your device volume: Ensure that the volume on your device is turned up to the maximum level. You can adjust the volume using the physical buttons or the on-screen controls.
- Use Spotify's "Loudness" preset: As mentioned earlier, Spotify offers a preset called "Loudness" that can boost the overall volume level. Activate this preset in the equalizer settings to make your music sound louder. Keep in mind that this may result in some compression and dynamic range reduction.
- Disable audio normalization: Audio normalization aims to maintain consistent volume levels across tracks. However, it may lower the volume of certain songs. Consider disabling audio normalization in the Spotify settings under "Playback" to avoid any volume reduction.
- Connect to external speakers or headphones: If you're using external speakers or headphones, make sure they are properly connected and have their volume turned up to an appropriate level.
By following these steps, you can increase the volume output on Spotify and enjoy your favorite tracks at a higher and more satisfying level.
Remember to be mindful of your hearing and avoid listening at excessively loud volumes for extended periods of time to prevent any potential hearing damage. The 60/60 rule is useful for keeping your ears safe. It means no higher than 60% volume for 60 minutes. After that you need to give your ears a rest. Althernatively you can listen on a lower volume for longer.
Other Audio Settings You Should Know to Make Spotify Sound Better
In addition to the equalizer settings, Spotify offers various other audio settings that can further enhance your listening experience. Let's explore some of these settings:
Audio Normalization
Audio Normalization is a feature that aims to ensure a consistent volume level across all tracks. It automatically adjusts the volume of songs to avoid sudden volume changes between tracks. With Audio Normalization enabled, you can enjoy a more balanced and consistent listening experience without constantly having to manually adjust the volume. You can enable or disable this feature in the Spotify settings under "Playback."
Audio Quality Level
Spotify provides different audio quality options to suit your preferences and data usage. The available options include "Automatic," "Normal," "High," and "Very High." The "Automatic" option adjusts the quality based on your network conditions. "Normal" provides a compressed audio format, while "High" and "Very High" offer higher-quality, lossy audio formats.
Selecting a higher audio quality level can enhance the overall sound fidelity, but keep in mind that it may consume more data. You can adjust this setting in the Spotify app's settings under "Audio Quality."
Hardware Acceleration
Hardware Acceleration is a feature that utilizes your device's hardware capabilities to offload certain tasks and improve performance. Enabling this setting can help reduce the strain on your device's CPU, leading to smoother playback and potentially better audio quality.
Hardware Acceleration is usually enabled by default, but you can verify and adjust this setting in the Spotify app's settings under "Playback."
Transition Settings
Transition Settings refer to the crossfade and gapless playback options in Spotify. Crossfade allows for a smooth transition between songs by overlapping the endings and beginnings, creating a seamless listening experience.
Gapless playback eliminates any gaps or pauses between tracks, ideal for albums or playlists where continuous playback is desired. You can adjust the duration of crossfade or enable/disable gapless playback in the Spotify settings under "Playback."
By exploring and adjusting these audio settings, you can tailor Spotify to meet your specific audio preferences and optimize the playback quality according to your device's capabilities and your desired listening experience. Experiment with different combinations of these settings to find the configuration that suits you best.
FAQ
What are the best Spotify equalizer settings overall?
There's no single "best" setting—it depends on your genre and gear—but a Balanced EQ (60 Hz: +2, 150 Hz: +1, treble: +1 to +2) is the safest all-purpose starting point before you fine-tune further.
Does Spotify have an equalizer on Android?
Not natively. The Spotify Android app links out to your phone's built-in system equalizer rather than having its own, so the settings you adjust actually apply at the device level, not just within Spotify.
Can I use custom EQ settings on Spotify Connect (casting to a speaker)?
No. Equalizer changes only apply to local playback. If you're streaming to another device via Spotify Connect, your phone or computer's EQ settings won't carry over.
Do EQ presets sound the same on iOS and Android?
Not exactly. iOS has its own built-in equalizer with a fixed set of presets; Android relies on whatever equalizer your specific phone ships with, so preset names and available sliders can vary by device.
Conclusion: Unlocking the Full Potential of Spotify's Equalizer
In conclusion, the Spotify equalizer is a powerful tool that allows you to personalize your music listening experience and unlock the full potential of your favorite tracks.
By accessing the equalizer settings on different systems, such as iOS, Android, macOS, and Windows, you can fine-tune the audio frequencies to suit your preferences, optimize the sound quality, and enhance specific elements of your music.
Whether you prefer a bass-heavy boost, emphasize vocals, or achieve a balanced sound, the Spotify equalizer, along with its presets and manual adjustments, empowers you to create a truly immersive and personalized music journey.
So, go ahead and explore the equalizer settings, experiment with different presets, and discover the perfect combination that brings your Spotify playlists to life.
And if you ever want to transfer your playlists to another music streaming service, make sure you download Free Your Music.

Your playlists belong to you.
Stop rebuilding by hand. Move everything in minutes and take your music wherever you go.
Download free →SongsBrew — our free music newsletter
A free perk for FYM users. Tips, playlists, no spam.